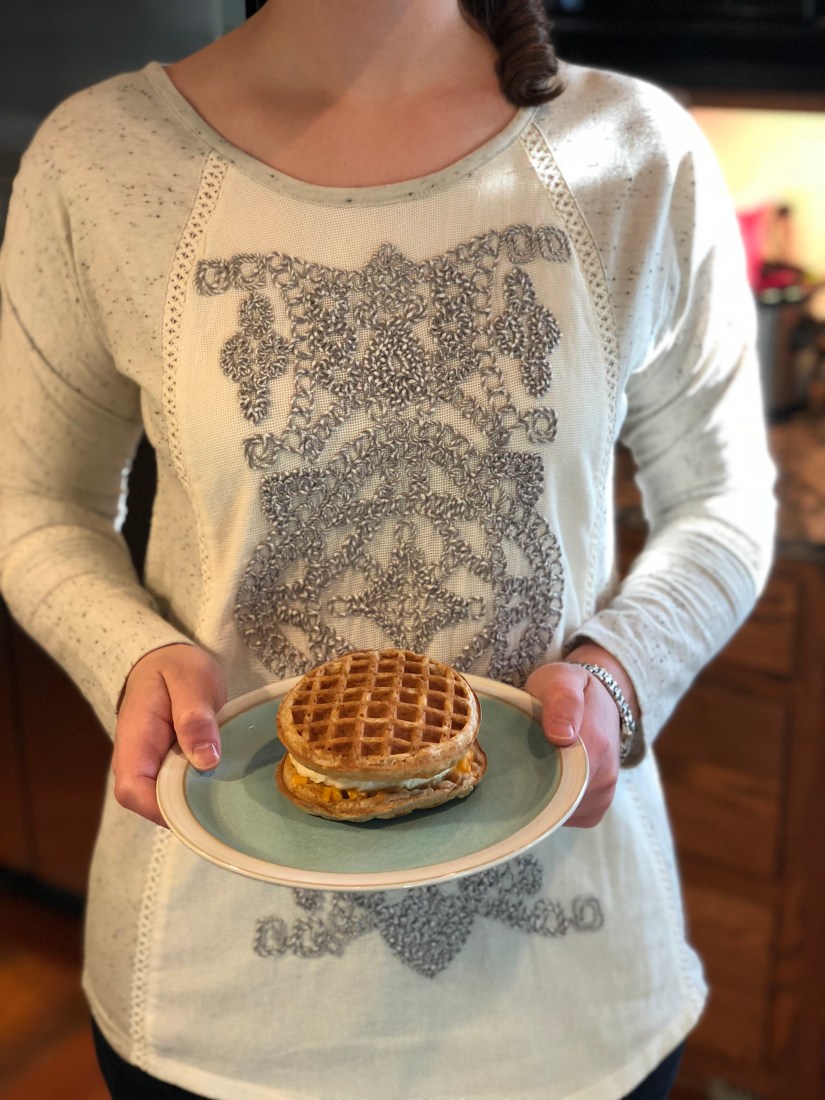
I had to feed a troupe of hungry adults breakfast before we headed out to Gettysburg National Park. But I didn’t want to have to get up and cook so I made these make ahead breakfast sandwiches and they were a huge hit. Claire helped me with the heating and serving of these little bits of yum. And also served as sandwich model!
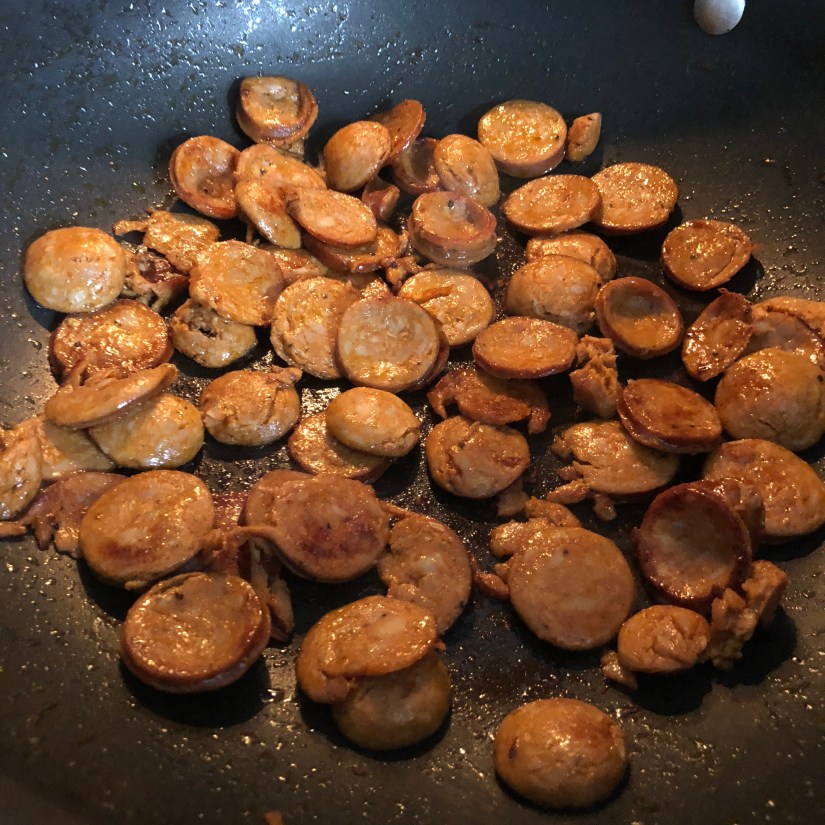
I used frozen whole grain waffles as my base and piled on eggs, pimento cheese and chicken sausage from there. But honestly you could use any combination of meat/cheese/egg. And could even substitute waffles for english muffins, crumpets or any carb your heart desires.
The only thing that is remotely time consuming is making the individual eggs. But I have a little trick up my sleeve that makes it slightly less onerous. I microwave my eggs in a wide based soup cup. Put a splash of olive oil in the cup, crack your egg in, sprinkle on some salt and pepper and microwave. Depending on how done you want your eggs your time will range form 30 seconds to a full minute. I did these for about 45 seconds each.
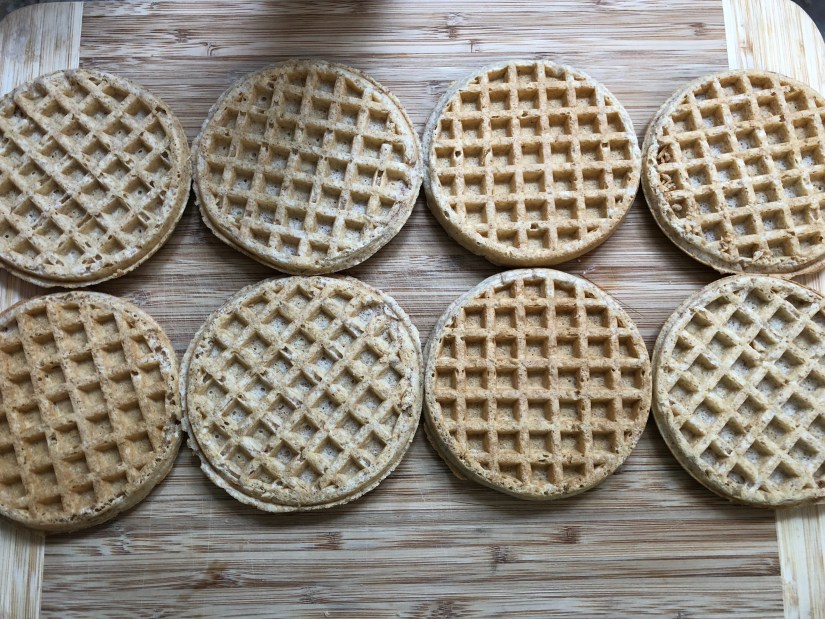
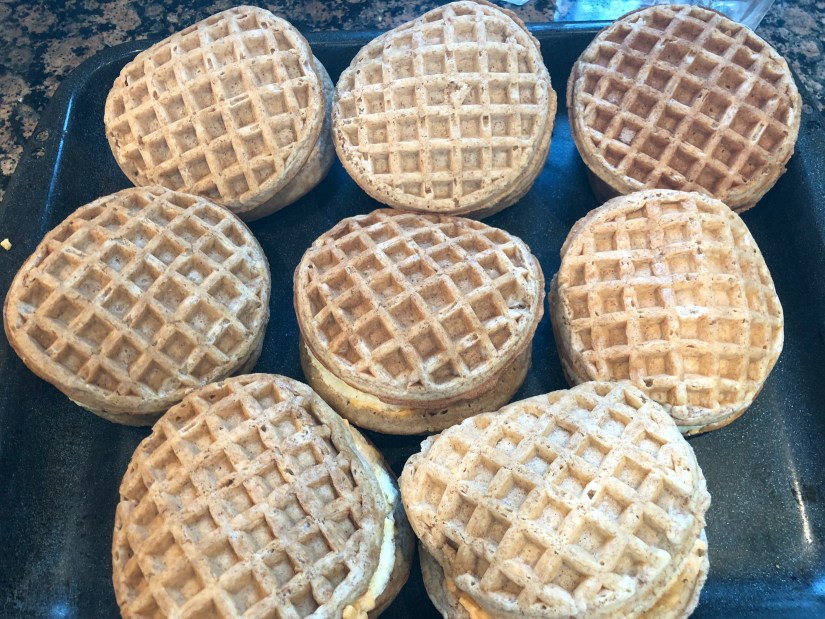
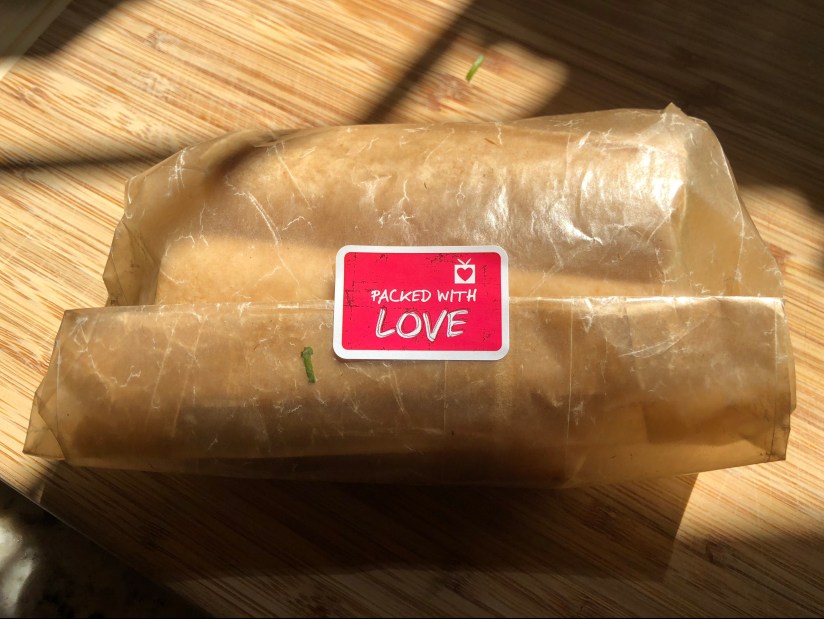
I had to make 8 sandwiches but my cutting board isn’t big enough for all the so I did them in two batches. I then bagged them up and put them in the freezer until it was time to take them up to our Gettysburg AirBnB.
We popped them in the oven heated to 375 degrees for about twenty minutes and they were ready to go. I also put out some fancy mustards and mayos so that people could jazz up their sandwiches.
As you can see freezing and reheating didn’t harm that at all. And the time in the oven got the pimento cheese all lovely and melty while the waffles crisped up. This would be an excellent thing to make on a Sunday and pull out of the freezer/fridge on a weekday morning and reheat in the microwave or toaster oven before work.
Let me know in the comments what you would put on your sandwich! I love hearing new ideas!
Ingredients, serves 8:
2 packages of frozen whole grain waffles
1 package of chicken sausage with four sausages
8 eggs
1 tub pimento cheese
Recipe:
Pull waffles out of freezer, do not defrost or warm up.
Apply thin layer of pimento cheese to two waffles
Cut sausage in half length wise and then again crosswise to leave you with four pieces.
Place two pieces of sausage on top of one waffle
Cook individual eggs in mug for 45 seconds after seasoning with salt and pepper
Place egg on top of other waffle
Close sandwich and put in paper bag and freeze or refrigerate.
Once ready to eat place on microwave safe dish and microwave for 1 minute if from fridge and three minutes if from freezer
If baking place in 375 degree oven for 20 minutes if from fridge and 40 minutes if frozen
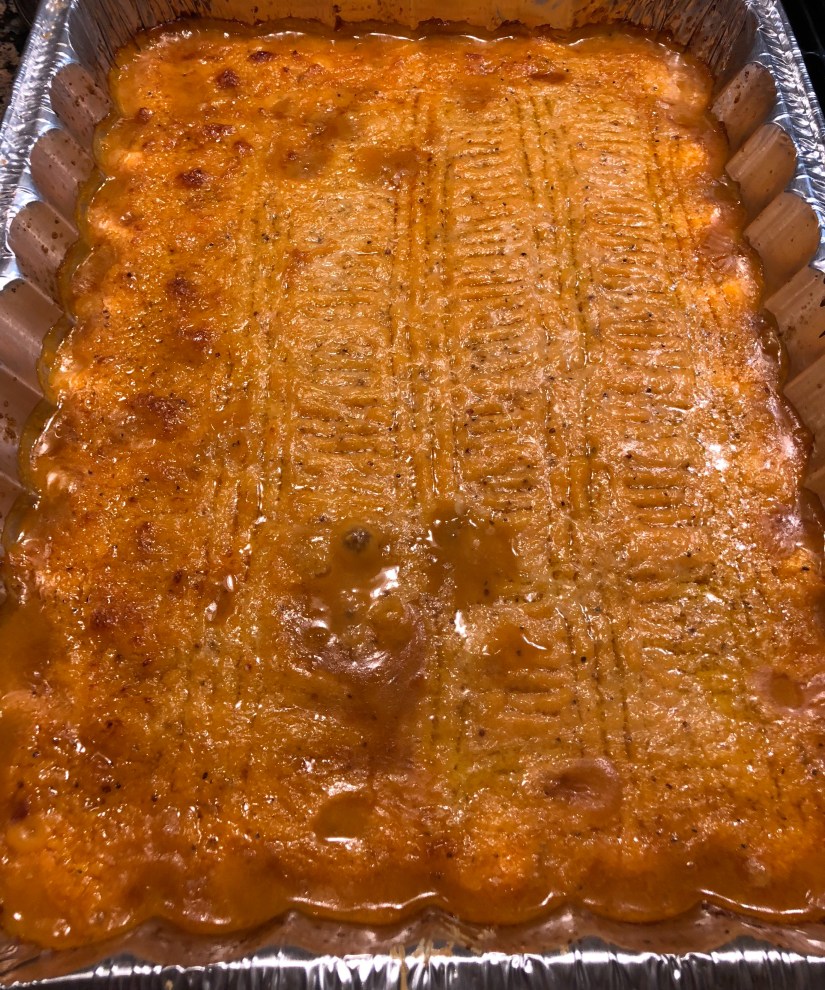
We are meat and potatoes people through and through. Lloyd comes from Irish stock and likes nothing more than a simple and hearty meal. My Indian taste buds want something with a little extra oomph of spice. And my common sense tells me that eating red meat and white potatoes isn’t the healthiest option. So I’ve tweaked the traditional Shepherd’s Pie recipe to something that meets everyone’s needs. Also, I made this Shepherd’s pie ahead of time, froze it, and then assembled it at an AirBnB where we were staying with a group of friends. So, if you are looking for a good “cook and take” recipe this is an excellent option.
You can’t smell the goodness or hear the delightful bubbling emanating from this pan.
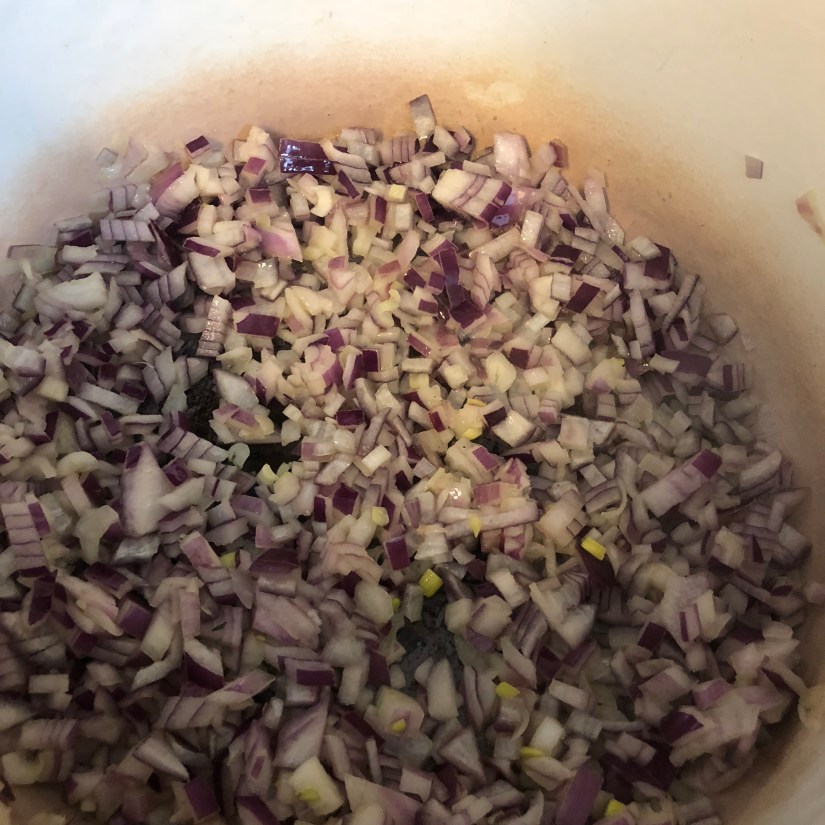
So to get started I did a little mise en place and chopped up my onions, carrots, mushrooms, rosemary and thyme. If you’ve read my Chicken Pot Pie recipe you will see a lot of similarities in the strategy and flavors. Once you know the basic patterns of cooking it’s easy to extrapolate those ideas to other recipes. But, I digress. First step is always sweating your onions.
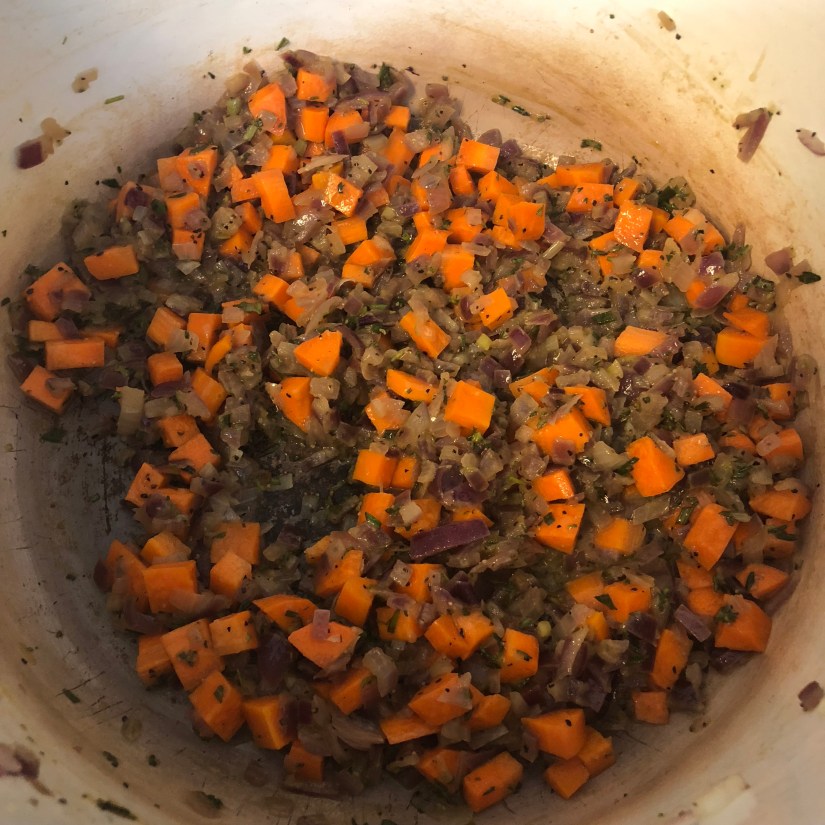
I used my dutch oven for this recipe because the thick walls retains a constant heat better and is more forgiving if you forget to stir. Once your onions are well and sweated meaning they have gotten that glistening look to them but they aren’t burnt or starting to turn brown it’s time to add your carrots.
Your carrots will start to cook, you know they are ready when the sharp edges begin to blunt and they get a shiny appearance to them. Now it’s time to add in your meat and herbs. Also you should be seasoning at every step. I always use salt, pepper and garlic powder. Also keep some low sodium chicken stock handy. This is excellent to splash in and deglaze when things get a little sticky.
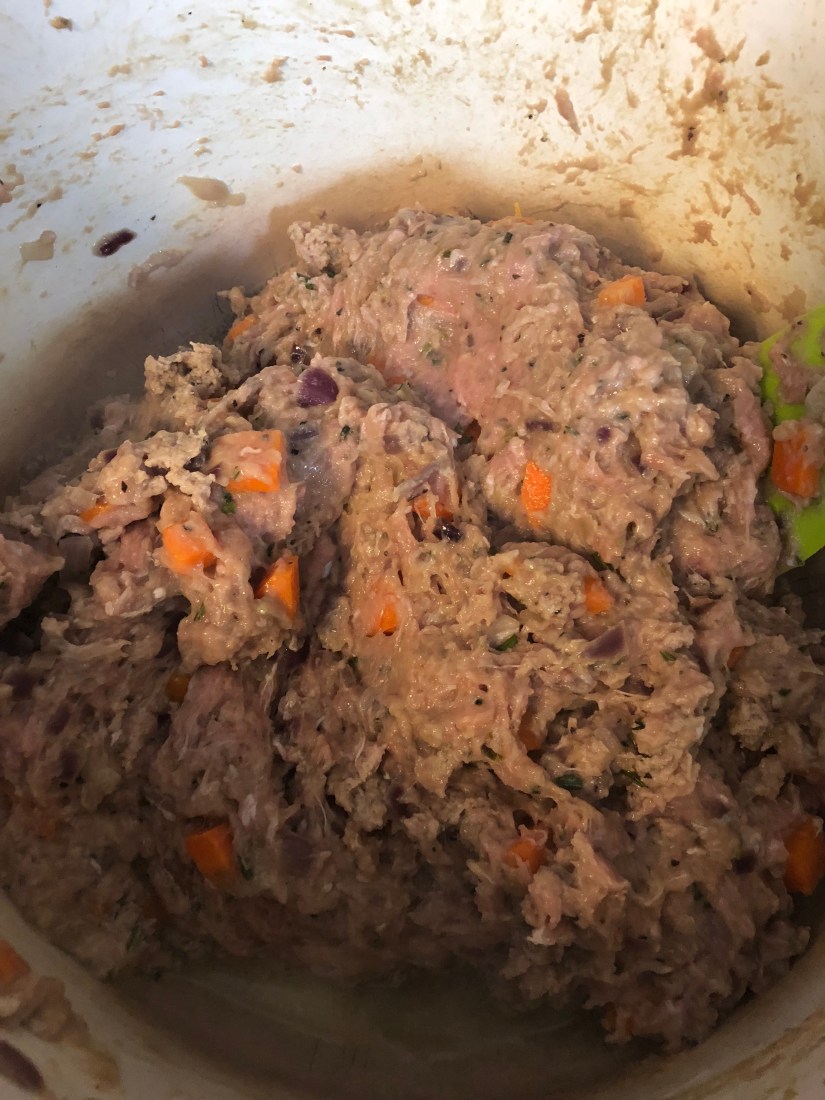
Once your meat is cooked down add in a hefty scoop of flour. This is totally optional if you are going the gluten free route feel free to skip this step. The flour is just used to thicken the gravy. You can always substitute arrowroot powder at the end. Also add in your peas and mushrooms once the meat is cooked.
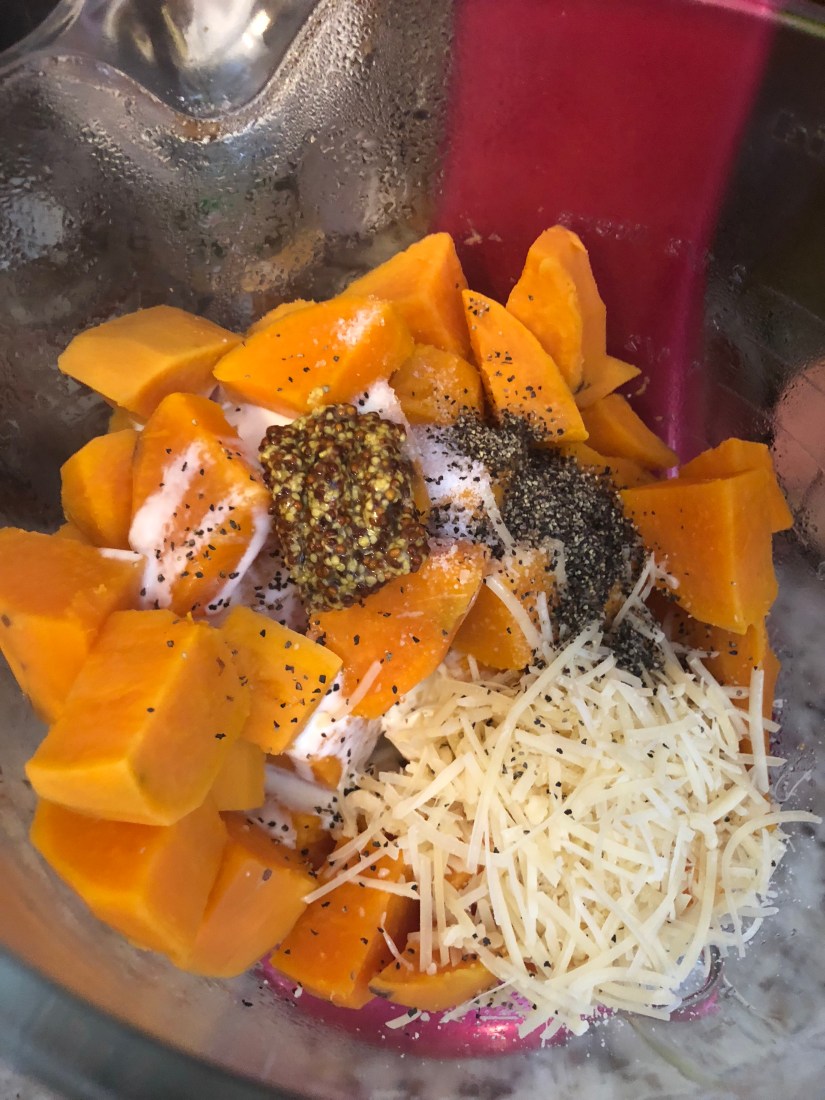
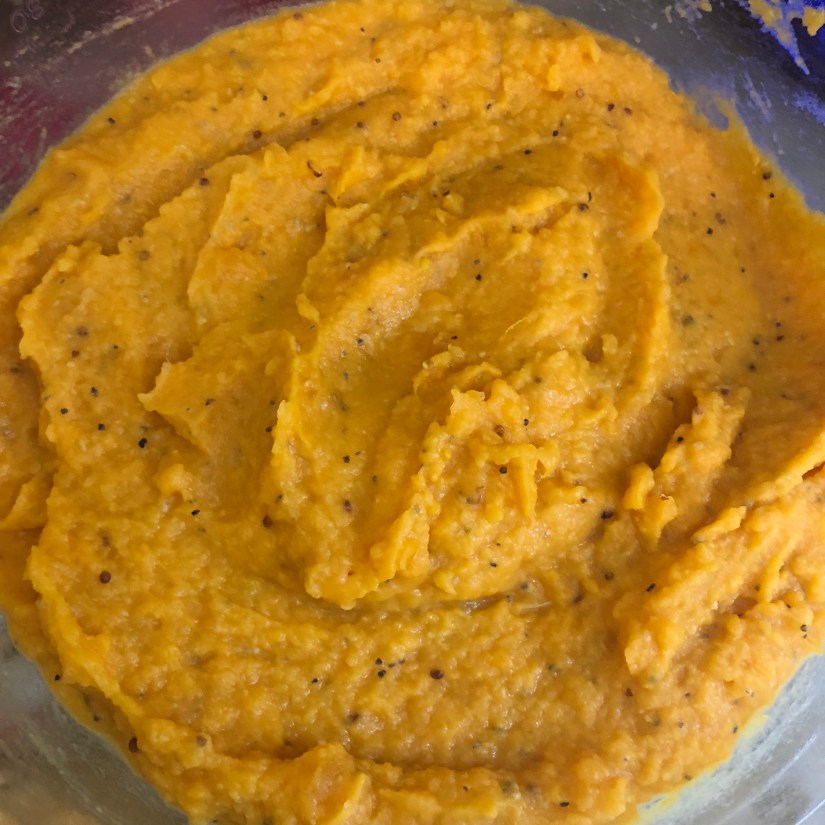
Add in a heavy, heavy splash of chicken stock and turn your heat down and let it simmer while you fix your sweet potatoes. Peel and boil like another potato once they are soft enough to smash easily with the back of a fork transfer the potatoes into a mixing bowl and add in some stone ground mustard, parmesan cheese, heavy cream, salt, pepper and garlic. Reserve some of that lovely, starchy water from the sweet potatoes to help fluff up your mash and then get to mixing! I use a kitchen aid. I’m lazy.
You want your mash a little extra runny because that way they don’t dry out when you bake it.
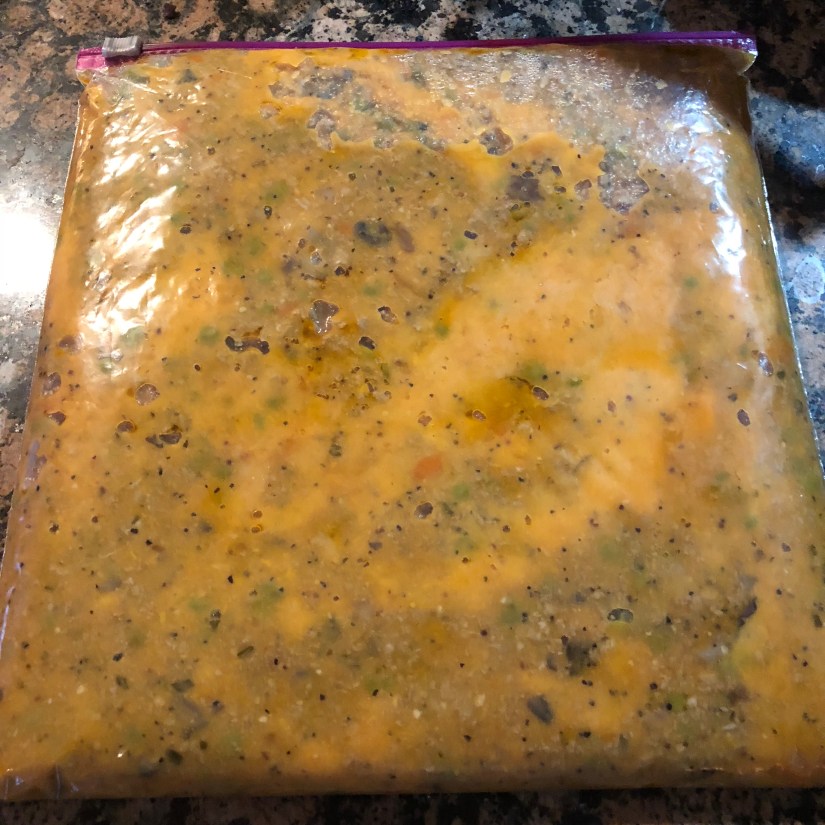
At this point you have a two options. Go ahead and assemble or bag it up, freeze and save it for later. And a secret third option; freeze half, cook the other half. I went the freezing route because we weren’t going to eat our pie for another few days.
Assembling is as easy as reheating the meat in a crockpot or on the stove and placing the bag of sweet potatoes into a bowl of warm water. I layered the meat onto the bottom of an aluminum pan that I brought with me and cut a hole in a corner of the sweet potato bag and squeezed it on. I decorated the top with some fancy fork work and add a layer of fresh shaved gruyere because cheese is the best. Then it’s time to bake. The boys were so excited!
Quick tip on leftovers. I just bagged the whole thing and froze it. When we get home I’ll unfreeze it and probably bake it into a quiche.
Filling Ingredients:
3 lbs of ground turkey
1 red onion
1 large carrot
1 bag of frozen peas
8 oz container of baby bella mushrooms
2-3 Tbsp of chopped rosemary and thyme
1 can of tomato paste
3 Tbsp flour
1 box of low sodium chicken stock
Salt, pepper and garlic powder to taste
Topping Ingredients:
4 medium sweet potatoes
2 Tbsp of heavy cream
4 oz parmesan cheese
1 Tbsp stone ground mustard
Salt, pepper and garlic powder taste
Recipe:
Chop your onions, carrots, mushrooms, rosemary and thyme while your pan heats with a glut of olive oil in it.
Add your onions and let them sweat, season with salt, pepper and garlic powder
Add you carrots and let them get sweaty, season with salt, pepper and garlic powder. Use stock to deglaze as needed.
Add in the meat and let it cook down until it crumbles, season with salt pepper and garlic powder
Once the meat is mostly cooked add in the dried herbs
Once everything is soft and crumbly add in your flour and mix it around until everything is coated.
Pour in whatever is left in your chicken stock container and add in your tomato paste.
This is also the time to add in your peas and mushrooms.
Reduce heat and simmer until sauce is thickened. Check seasoning and adjust accordingly.
Peel and chop sweet potatoes and add to pot of well salted water.
Bring to a boil and cook until potatoes are fork soft.
Add all ingredients to a mixing bowl and mix until soft. Use potato water to get the consistency you require.
Freeze or assemble.
Layer casserole dish or baking pan with fulling mixture. Pipe or spoon on the sweet potatoes. Smooth with a spatula. Decorate with a fork if you want and top with cheese if you want.
Bake at 400 for 30-45 minutes until crust is golden and bubbling.
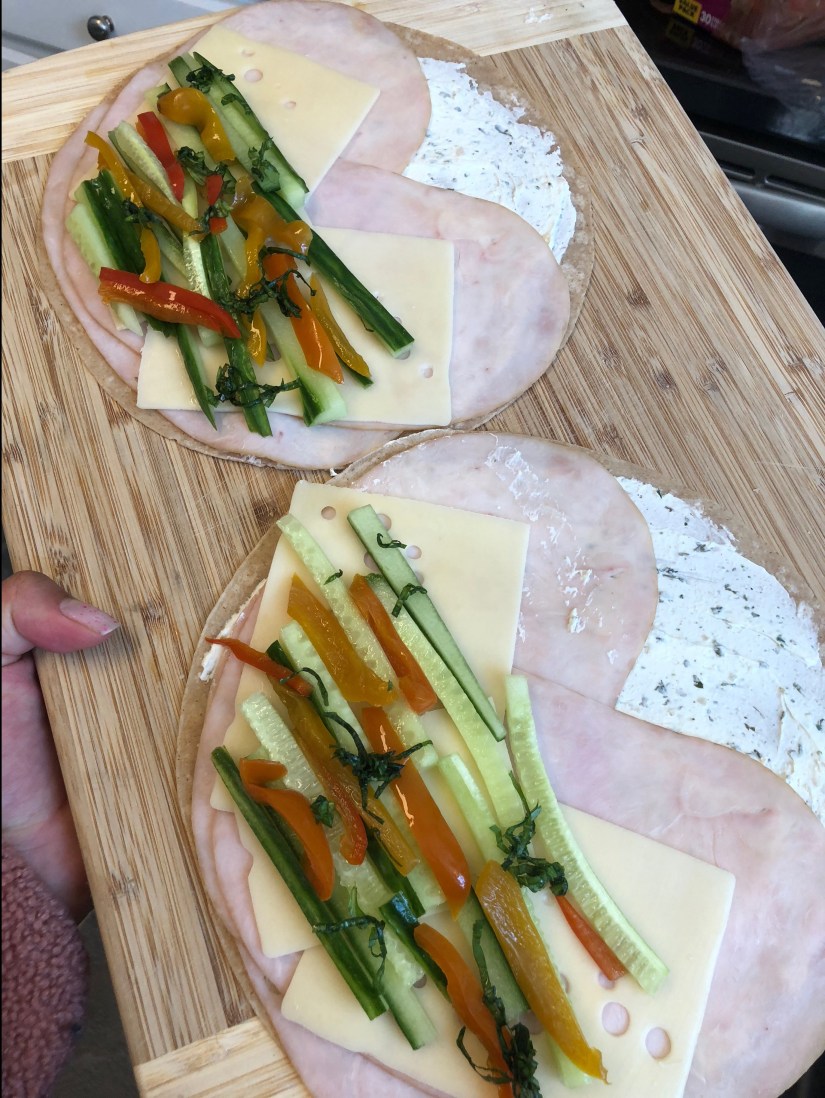
I like a fast and easy lunch that I can just grab out of the fridge and throw in my bag on my way out the door. Bonus points if it’s teetering on the healthy side. I have a little inventory of go to recipes and I pick which one I want to use based on what’s already in my fridge come Sunday afternoon. This week I went for wraps because I had a cucumber that I needed to use. Makes sense, yes?
I know wraps seem a little boring but it gave me a chance to brush up on my knife work. So I julienned the cucumbers like my life depended on it. My little hack is too cut a small slice along one length of the cucumber. This lets you balance it when you cut. And then you can just cut across the slices to get your matchstick shape.
Next I pulled a jar of pickled peppers out of the fridge. These are homemade sweet pickled peppers that peter piper did not pick. But my friend, Claire, and I made them for her husband’s birthday a while back. The next time I have a pickling party I’ll be sure to take pictures and put it up on here! Anyway, I julienned these as well.
My last knife related prepping step was to chiffonade some fresh basil I keep on the window sill above my sink. I know it sounds a little pretentious to say out loud that you are going to chiffonade your leaves. But honestly it is the best way to thin slice a leafy thing. And it is extremely easy. Lay your basil leaves one on top of the other and roll them up tightly. You will be amazed at how easy it is to slice into thin strips when you do it this way.
Once the basil (or any herb is thinly sliced) I sprinkle some salt and smoosh everything together. This bruises the leaves and seasons your herbs so the flavor really pops. Now comes time for assembly. I suggest the assembly line method so that you can get all your wraps made quickly and ready for the fridge. I start my wraps with a spreadable cheese. I had Aloutte’s garlic herb cheese already in my fridge so that’s what I used.
Next layer your sliced meat and cheese onto your wrap. For these wraps I used honey smoked turkey and Swiss cheese because they are Lloyd’s favorite and therefore what was available. And then add in all your beautifully sliced veggies. I also have quite a wide chopping board so I was able to do two at a time.
Roll em up, cut in half and package them any way you want. I made 6 and they should last through Wednesday. The cucumbers will stay nice and crunchy and the wraps don’t get soggy like bread would. The spreadable cheese really acts as a barrier, preventing the the veggies and deli slices from making your wrap slimy.
The beauty of this recipe is how endlessly versatile it is. Use whatever deli meat and cheese you want, any type of wrap, whatever your favorite veggies are (or just whatever you have at hand). The one thing I wish I had done was sprinkle on some hot sauce prior to wrapping. Because everything is better with Cholula!
Let me know in the comments what you would make your wrap with!
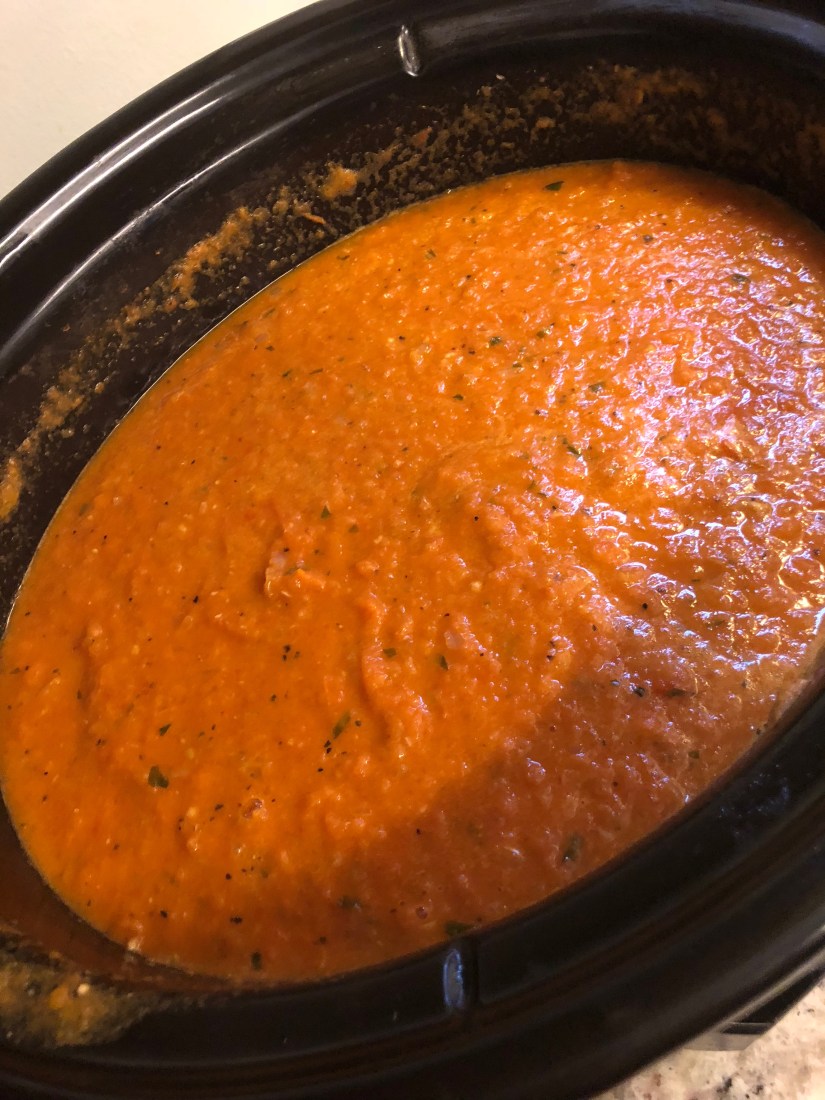
It’s cold in Virginia right now, winter is clinging to the ground and the air and my bones need soup. Soup means crockpot time. I know crockpots are getting a bad rap right now because of that episode of This is Us. But they really do make life a lot easier. I tend to get done early on Mondays so I like to make one thing in the crockpot that I can tweak and twist and use all week. Given the weather I went for a hearty tomato basil soup.
I use my crockpot two ways, I either dump a bunch of stuff in and go off to work so that I can come home to a mostly ready meal. But sometimes I use my crockpot as a less needy dutch oven and add things in slowly and really let the flavors marry and come together slowly. I went for the latter technique this time because I had a bunch of little things to do around the house and this allowed me to add things and go get a task done before coming back to check on it. I started by caramelizing a bunch of red onions with butter, salt, pepper and garlic powder.
Once those were cooked down and I’d printed off all the labels for my amazon returns I started on my tomatoes. Since I have an immersion blender I tend to thick chop my tomatoes because they are going to cook down regardless of the size and nobody has time for a petite dice. But I do have a technique for my touch chop that can be done pretty quickly once you get the hang of it.
First start with a pile of sexy looking tomatoes. The sexier your tomatoes the sexier your soup will be. That’s just a fact. Kidding, start by slicing your tomato in half, then remove the stem with two angled cuts and discard. Next you need to cut slices lengthwise along the tomato and then flip the whole thing around and cut perpendicular. Scoop ’em all up and add them to the crockpot. Easy Peasy, tomato choppy.
Once the tomatoes have been added in and you have seasoned again it’s a good time to throw the cover back on and let those bad boys stew. At some point your whole house is going to fill with the tangy smell of cooking tomatoes. At that point it’s time to revisit and add in the last few ingredients you need before it’s ready to be blitzed.
I love the roasted garlic you can find at most olive bars. I get a whole container and just pull them out whenever I need a little extra oomph in my food. I also love the perfect fresh balance that basil and tomato make so I chopped up some of that. And then you always need more salt and pepper. Once that has stewed for some more time it’s time to blitz. I wanted to make a nice little boomerang so you could see how cute my immersion blender is. Total fail.
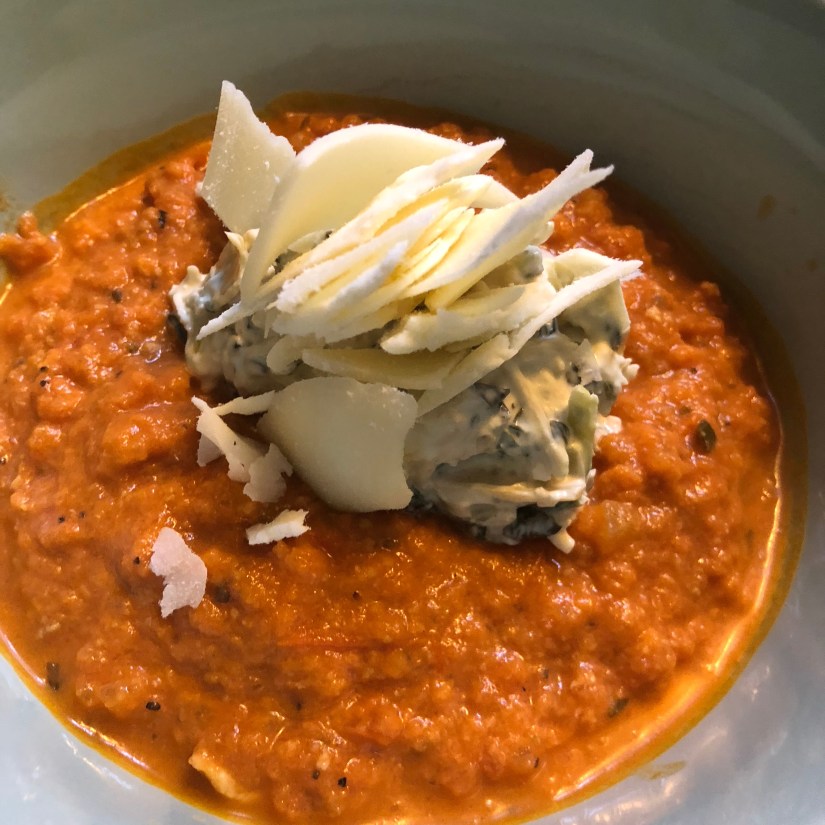
Once I had blitzed the soup I added in some tomato paste, parmesan cheese, a dollop of heavy cream and a couple of splashes of low sodium chicken stock just to round out all the flavors. I also needed to add in a little more salt, garlic and pepper. Because crockpots are tricky and always need more than you think they will.
Now on to the three ways I decided to serve my soup! This was the fun part! Because you don’t want to get bored with all your hard work!
Day 1: Sausage and Parmesan Crisps
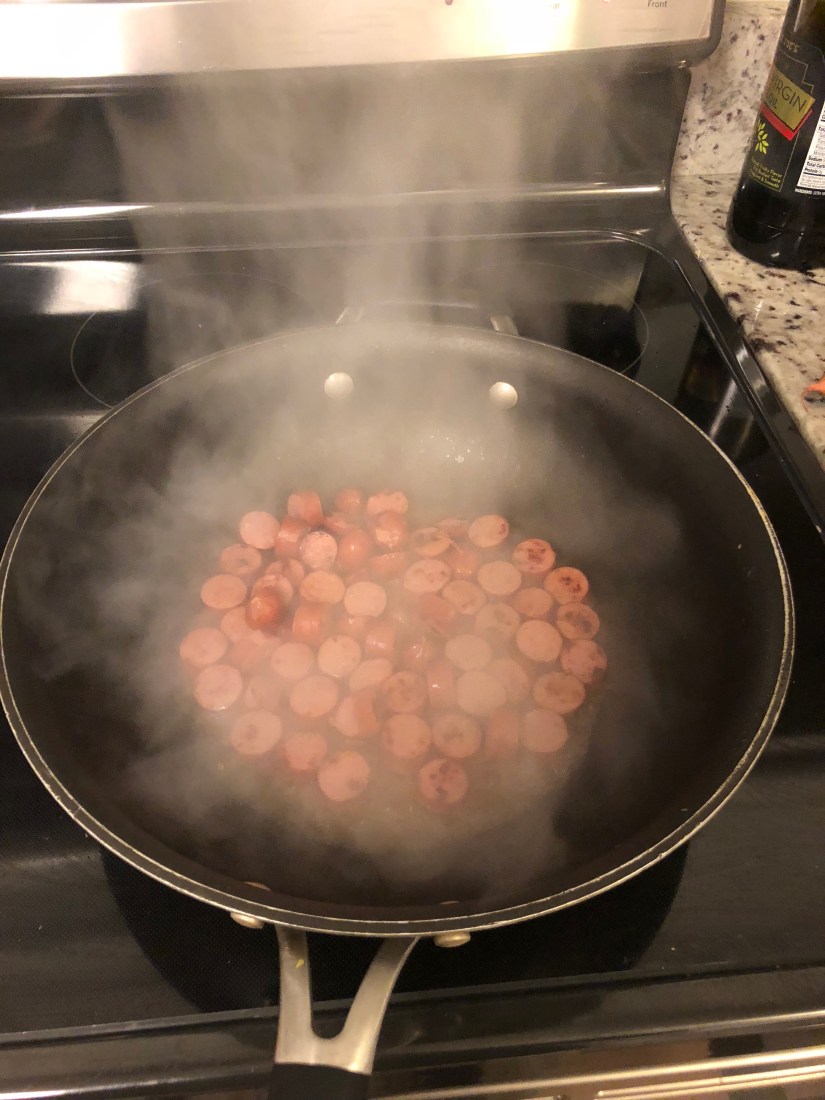
This one was fairly straightforward, while the soup was finishing off in the crockpot I chopped up some smoked sausage I had in the fridge and cooked it in a pan on the stove. My secret for cooking meat like this are a few splashes of low sodium chicken stock. It helps deglazes the pan and lets you steam rather than roast so they don’t dry out. This billowing cloud above my pan is steam, not smoke. I promise.
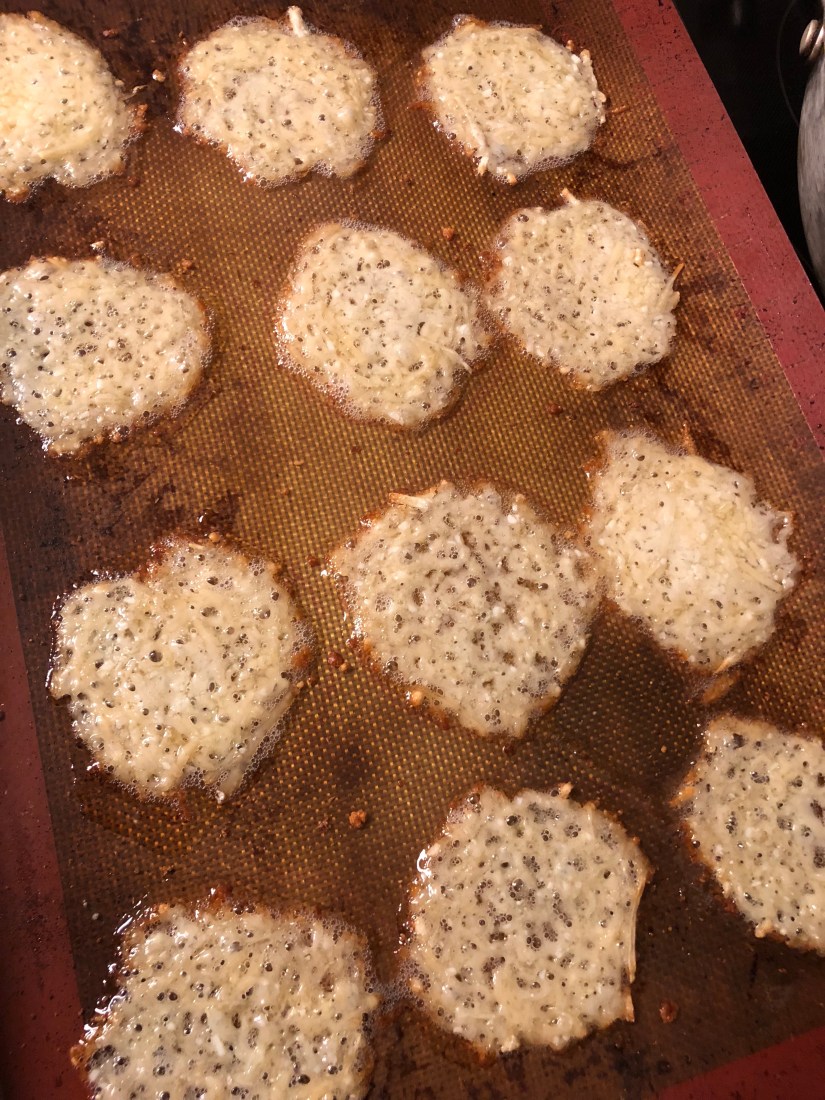
Next I took a 4 oz container of parmesan cheese and made twelve little piles on a silicone baking sheet and baked them at 400 degrees for 3 minutes to make amazingly easy and low carb parmesan crisps!
I know they look a little soggy but I put them on a paper towel to cool and they crisped up beautifully. They did get a little melty when I put them on the hot soup.
Day 2: Roasted Chicken and Stuffed Bell Peppers
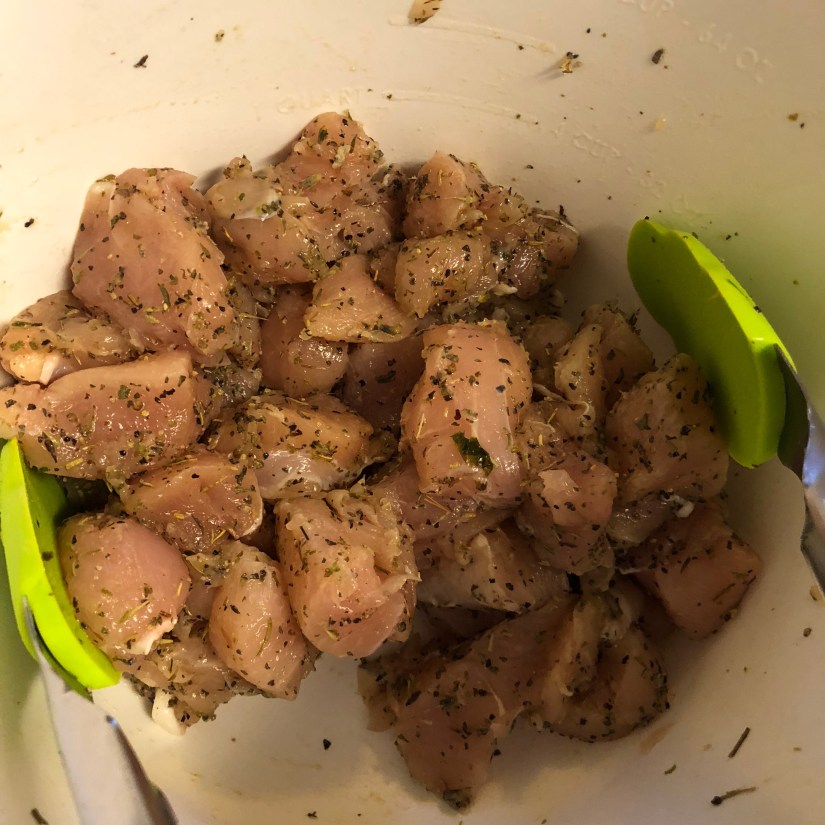
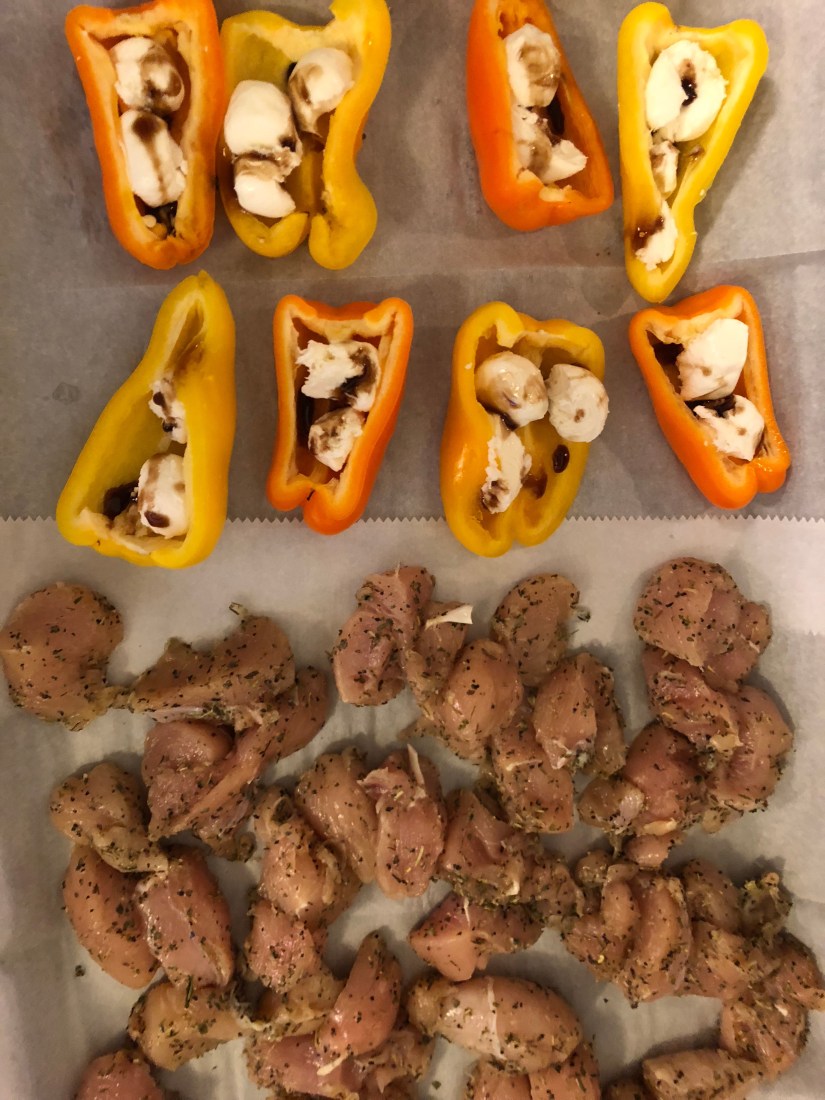
I love herbs de Provence. It’s a wonderfully savory spice mix that goes well with a variety of proteins and flavors. I particularly like it with tomatoes so I decided to coat some cubed chicken in Herbs de Provence, along with salt, pepper, olive oil and a splash of red wine vinegar.
I set those aside to quickly marinade while I sliced open some small bell peppers and stuffed them with mozzarella I happened to have in my fridge. These little packets are actually meant as single size servings but I am amazed at how handy they are when I haven’t planned ahead.
I ripped them up and stuffed them into the bell peppers. I added a little drizzle of balsamic vinegar because I love balsamic. I baked everything together on the same sheet pan while I reheated some of the soup up on the stove. I set my oven to 375 degrees and left everything in there for about 30 minutes.
I decided to be bold and serve my soup on a plate as it had gotten quite thick on the stove. It actually was pretty easy to eat this way and was a delicious treat after a long day at work because it was so quick yet surprisingly fancy and satisfying. Lloyd doesn’t usually stop to talk once food is in front of him but he put down his fork long enough to tell me it was good. Le sigh.
Day 3: Cheese Straws and Cheese
By the end of the week I was truly ready for something easy peasy. I throw the remains of the soup into a bowl and microwaved until it started splattering. I stuck a couple of cheese straws in there and sprinkled some cheese on top and called it a day. Honestly the simplicity of this meal was what made it so great.
Day 4: Spinach and Artichoke Dip
And last but not least I just had a little bit of soup left and also some spinach artichoke dip and I figured that they would probably go really well together. I was not wrong. Also, the cheese ended up looking like the Sydney Opera House which was not intentional but totally cool.
Soup Ingredients:
8 largish tomatos
Half a stick of butter
1 large onion
6-8 garlic cloves (roasted or raw, dealer’s choice)
10-12 leaves of basil
2 Tbsp of tomato paste
1 Tbsp of heavy cream
1/2 cup of low sodium chicken stock
Parmesan cheese to taste
Soup Recipe:
Caramelize onions and butter with salt, pepper, garlic powder to taste in your crock pot (set to high) for about 1-2 hours
Chop and tomatoes and cook until mushy for about 1-2 hours, season as you go.
Add in basil and garlic once tomatoes are ready to be blended then blend. Do not splatter back splash.
Add in heavy cream, chicken stock, tomato paste and parmesan cheese and let simmer for about another hour.
Alternatively you could put everything into the crockpot at the very beginning and just let it stew for hours and hours until you decide to blend it up. It will still be delicious and is a lot less work.
We only went out to eat once while in Napa, preferring to cook at home. But our one meal out was definitely a home run. Zuzu in Napa, CA is a tapas restaurant that has a full wine and beer list, serves tapas in the traditional Spanish small plate style and also has authentic sangria and paella on hand to satisfy any customer. I got to have dinner with two of my oldest friends (and bridesmaids), Ermentrude and Phryne. As well as my friend, Kimbrough, from Richmond, VA whose heart is as golden as her hair.
I know small plates are a bit of a fad right now but tapas have been around for much longer than they have been hip in the restaurant scene. There are a couple of different origin stories but my favorite is that King Alfonso X of Spain had some mysterious illness that prevented him from eating large portions. So instead he ate only small meals with wine. This trickled down to the common people and became so popular that to this day wine must be served with food and so small plates are an integral of Spanish food culture. In fact when I visit my family in Spain we stop at this small restaurant in downtown Malaga and eat their entire tapas menu (except the sweet meats). The picture below is circa August, 2014. We are full of food and wine and all smiles!
But back to Napa, 2018. When I was looking for restaurants I actually found two different tapas restaurants blocks from each other on Main St. After some research I decided we should try Zuzu and I am so glad we did. They don’t take reservations but after a short wait at the bar we were seated and able to cheers to an auspicious start to our Napa travels! They have a great wine collection and we enjoyed a lovely Tempranillo with dinner. But what’s better than Spanish wine with Spanish tapas?
The most difficult thing about tapas is trying to decide what to order. We decide to each pick 2 things and then threw in about three honorable mentions based on the staff’s recommendations. The staff was brilliant and knew exactly what order to brings things out in. They started with the cold items and slowly built up to the heavier offerings. It was the perfect meal and in true Spanish fashion took us over an hour to get through. Some of my favorite dishes were the seared rockfish, roasted beets, arugula and shaved truffle salad and calamari ceviche pictured below. I also loved the flat-iron steak and fried Manchego but by the time we got to the heavier dishes I had put my camera away so I could just enjoy the food and company.
Zuzu is a smallish two story restaurant and we were nestled under the stairs. It was perfectly cozy and intimate this way. And since I’m short I wasn’t even at risk of banging my head! I didn’t try the other tapas restaurant to give a fair comparison but the vibe we felt when walking past to get to Zuzu was definitely not as homey. I think we made the right choice. Although speaking of choices we couldn’t decide what to get for dessert so we just got one of each!
Clockwise from the top we have a chocolate cream de pot, a caramelized apple empanada, a basque cake and a piece of heavenly tres leches cake. Despite the 12 small plates prior to this all four dessert plates were completely cleared. I can’t say enough how much I loved this meal. If you ever find yourself hungry in Napa and unsure where to eat I think you must go to Zuzu!
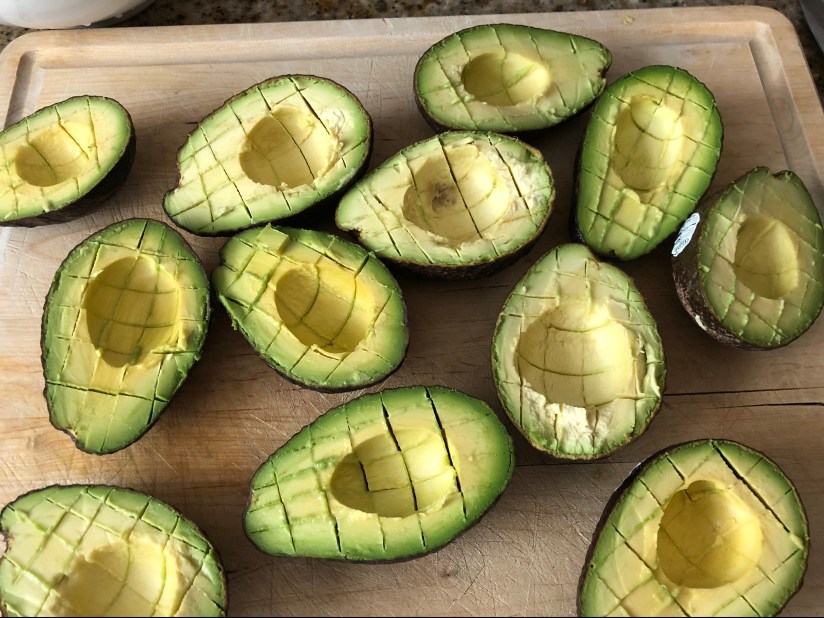
I like my guacamole like I like my men, bright green and thick. So basically what I’m telling you is I have a weird thing for Shrek and I’m about to divulge my not so secret guacamole recipe. I was recently in California and the opportunity to use the freshest avocados I have ever seen to make this guac. It was something that had to be recorded for posterity because you don’t get avocados this fresh in Virginia. Especially not in March. Also, of note, it is currently snowing in Virginia. It wasn’t snowing when I was in California yesterday.
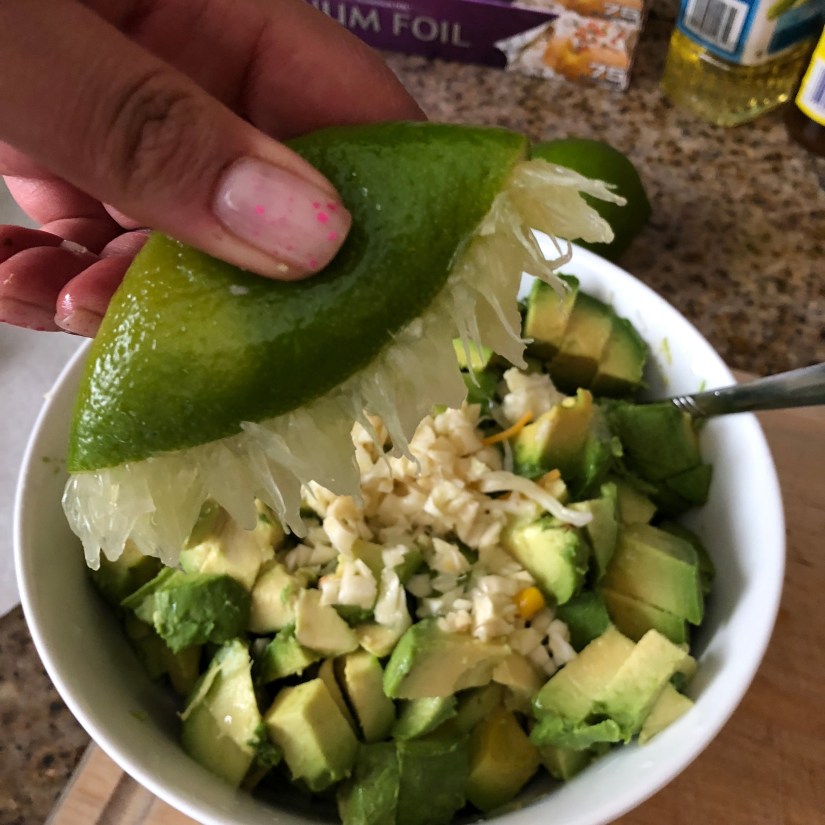
The thing that really blew me away was how easily the pit came out. No need to thwack the knife into the pit to pull it out risking serious hand injury. My friend, Claire, who is going into hand surgery has a minor heart attack every time she sees me make guacamole. This time she did not have to worry as they practically fell out. Your avocado skins can be saved to use as tiny serving dishes later on. But usually I can’t even get it transferred into a serving bowl before people are scooping it out. Now most of you probably know the rudiments of guac crafting so I’m just going to share some helpful pointers. First and foremost, microwave your limes! What? That’s crazy! Nope, it’s actually a really good habit to get into with any citrus fruit if you want to get the max juice out of it.
YOU PUT THE LIME IN THE MICROWAVE AND SHAKE IT ALL UP! DOCTOR!
Okay, I’m all better now. But, honestly this is a hack worth remembering. A warm citrus fruit will release a significantly greater amount of juice. Depending on how cold, ripe and big your lime is the perfect length of time can vary. I usually start with 15 seconds and go up in increments of ten. I know it’s ready when it feels a world softer and is just hot enough that it’s a little uncomfortable to hold in a closed fist. This is good because the next step is to roll that lime around in between your palms pressing gently, this releases the juices even further. For a larger fruit, like grapefruit, it might be easier to roll it between your palm and the counter. Once your cut it in half squeeze like your life depends on it! And don’t forget to use your pulp. I cut it off and scrape it into whatever I am making
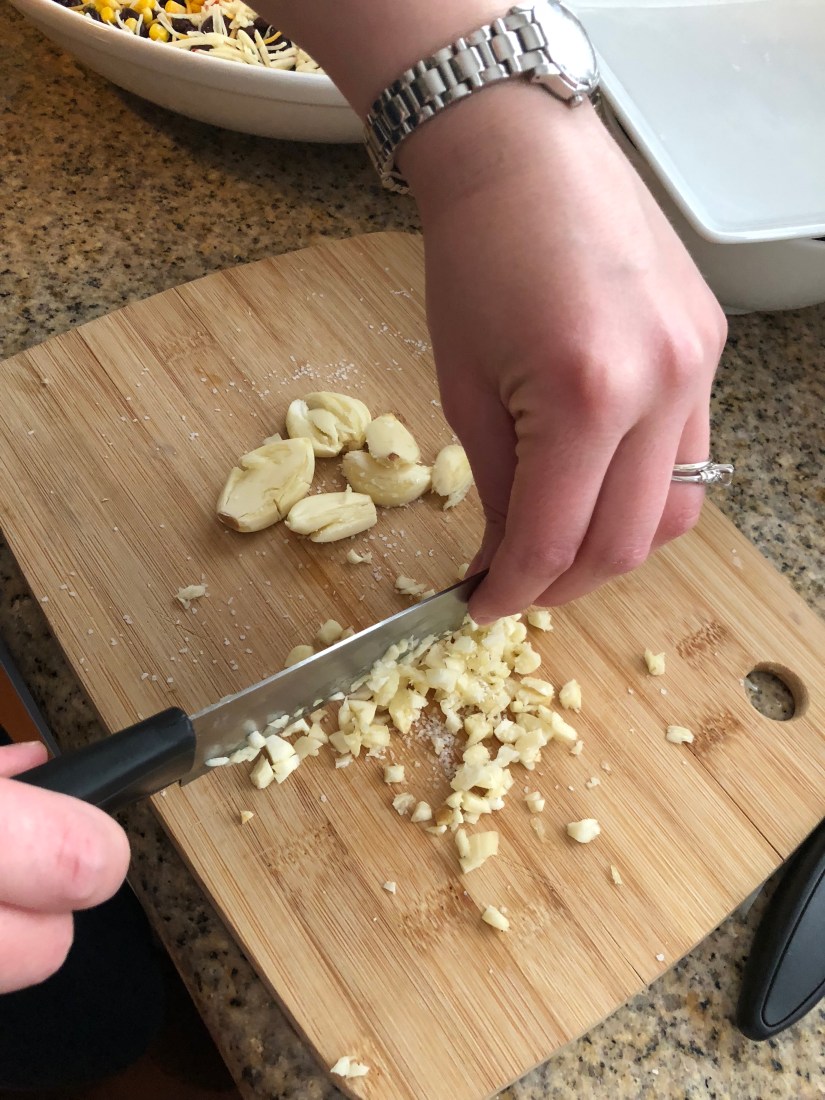
My other little hack is in regards to your garlic. We didn’t have a handy piece of Tupperware to shake the cloves in to help us peel them but this stuff was pretty fresh and peeled easily. Have I mentioned that California produce is insanely fresh? I just want you all to know that I keep a large of jar minced garlic in my fridge and a backup one in my pantry so I will not judge if you decide to go that route. But every now and then I think their are times when fresh garlic is worth the hassle. And girls’ night guac is one of those times! So once you have your peeled garlic it’s time to get to dicing. I find it easier to squash all my cloves with the flat side of my knife blade and then sprinkle the cloves with a little salt before doing a quick rough chop. The salt helps bruise the garlic and seasons it all at the same time. I wanted ya’ll to see how to the hold blade for the rough chop so I asked Hand Surgeon, turned Hand Model, Claire to demonstrate.
Once you have your avocados, onions, garlic, salt and lime all sorted in a bowl it’s time to customize. Some would argue that garlic and onions should be part of customization. But guacamole without garlic and onions is like wine without grapes. It just makes no sense. And I feel almost as strongly about coriander and tomatoes but there are people who I know and cook for that do not eat tomatoes and coriander. It’s shocking, I know, but there you have it. So at this point you have the option to add in jalapeños, coriander, tomatoes, cumin, bell peppers. I personally don’t like bell peppers but the rest all goes in. I’m also not a huge fan of that raw onion taste to I tend to use milder onions like shallots or scallions instead of the red onions that you will often catch me cooking with. As far as your jalapeños go the finer your chop them the less likely that someone is going to get a great big piece in their mouth and be on fire for the rest of the night. If you want to avoid getting the capsaicin juice all over your hands and then in your eyes when your friends are so sweet that they make you weep tears of joy (I’m speaking from experience) you can avoid hand chopping by just blitzing them in a blender or food processor. I really wish I had done that because my eyes and face burned for the better part of the night.
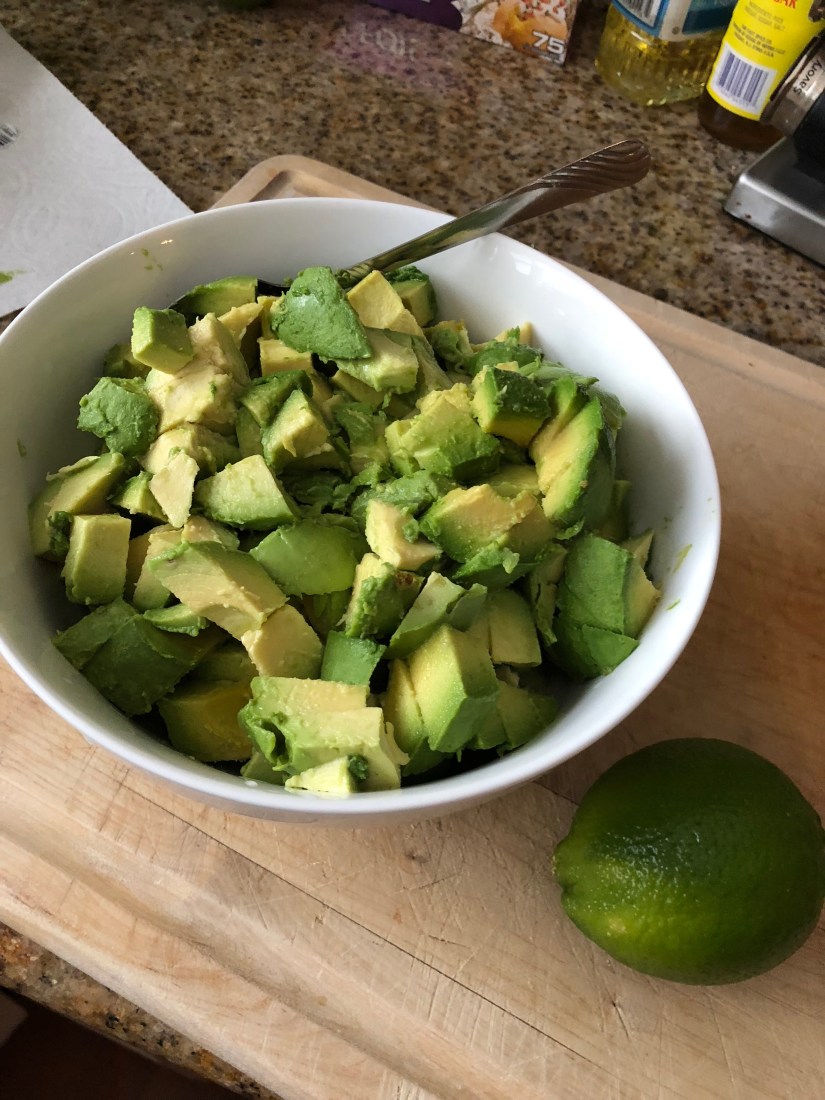
Funny story, I ended up mixing this up in a cooking pot because it was the only receptacle large enough and while I had every intention of plating it into something pretty and getting a picture of my bright green guac surrounded by a plethora of blue and yellow corn tortilla chips my girlfriends devoured it before I got a chance. Truthfully the began devouring before I even had it completely spiced. All under the guise of “taste testing,” I’m sure. So I will leave you with this picture of a heaping bowl of diced avocados instead.
Time: 30 minutes
Serves: 6-8 (based on the number of avocados you use, for the seven of us I used six largish avocados)
Ingredients: These ingredients are directly proportional to the amount of avocados you use and my particular taste. Feel free to adjust for your palette and the number of people you are serving.
6 largish avocados
1-2 fresh limes
1-2 jalapeños
6-8 cloves of garlic
8 -10 scallion heads thin chopped
Handful of coriander rough chopped (including finer chopped stems)
1 medium tomato
1 Tbsp salt
1 Tbsp cumin
1 Tbsp garlic powder
8 -10 scallion heads thin chopped
Recipe:
Dice your avocados. Cut in half, remove pit while avoiding slicing your hand open, use a dull blade to section your avocado cross and length wise, scoop into very large bowl with a spoon.
Cut and juice lime as above.
Peel and dice garlic as above.
Fine chop or blend an jalapeño, more or less depending on your taste.
Chop your onion, I used the scallion whites and saved the greens for another dish. But you can use whatever you prefer.
Rough chop the coriander leaves and finely chop the stems before adding to the bowl.
Finely chop your tomato and scrape the juices and seeds into your mixing bowl.
Add in your dry spices, I use a little extra garlic powder to give the guac a more uniform garlicky flavor. Add your salt in small amounts and mix well before trying. It’s very easy to go overboard but an under salted guac is too sad to fathom.
Mix, mix, mix until you have the consistency that you want.
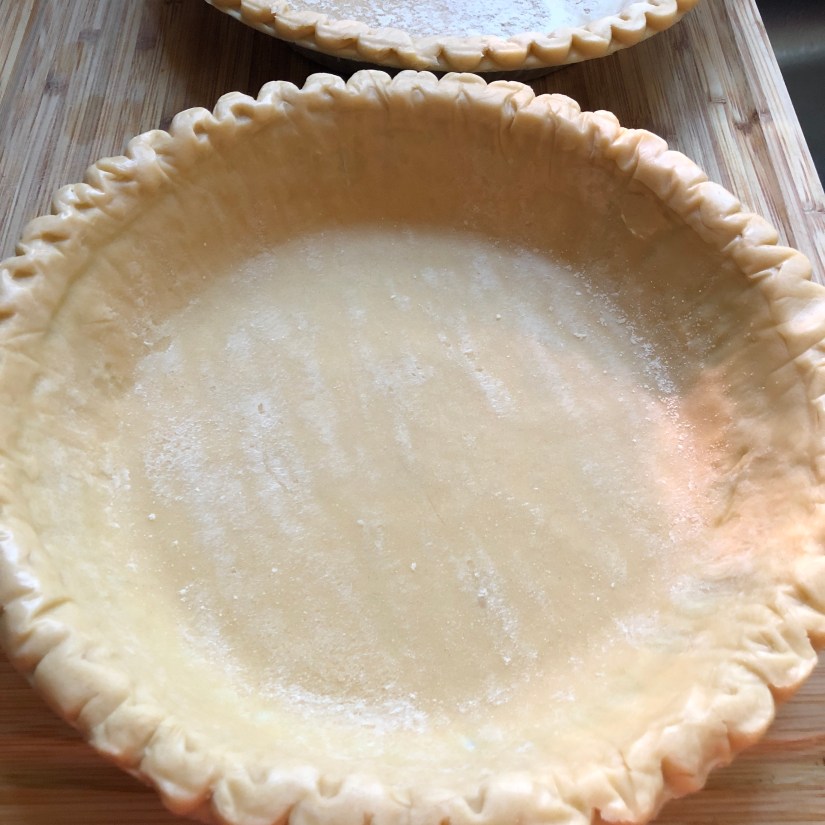
Do you hate having to throw away food that you bought and never got around to using before it hit the expiration date or just got plain gross? Me too! I usually end up pulling everything that’s about to go bad out of the fridge and staring at it until I come with a way to throw it all together. Today I was slightly more prepared though and had a couple of pie shells in the freezer so I could make quiche with whatever was left in the crisper. And because pie shells come in pairs I made a second quiche that I could freeze and eat next weekend.
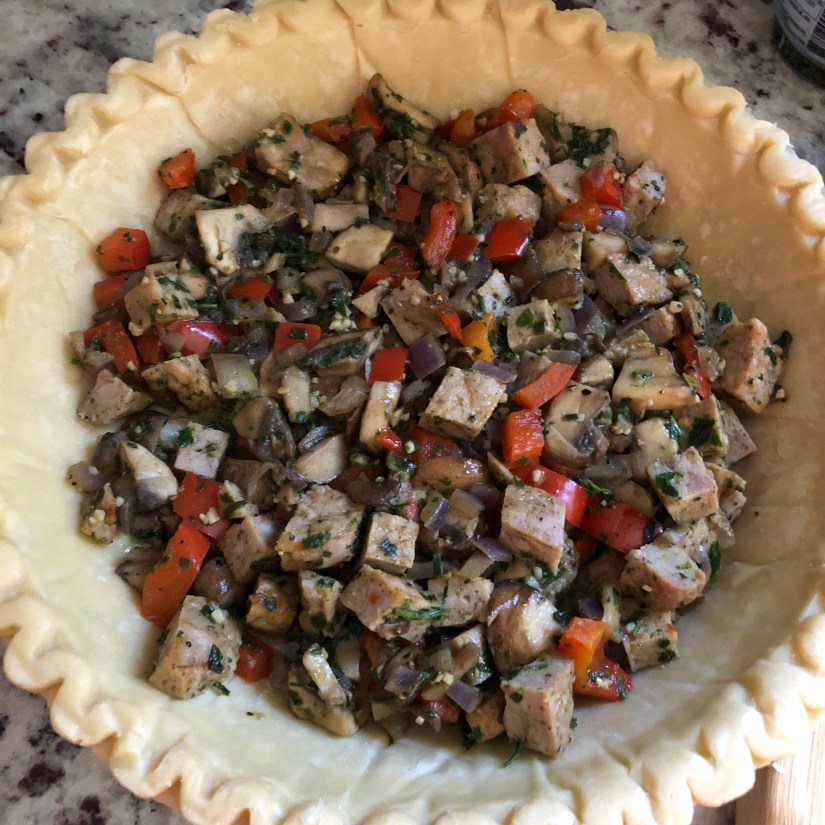
After today’s crisper raid I had half a red onion, a smallish red bell pepper and a box of sliced mushrooms. Plus some assorted herbs that were on their very last leg; basil, chive, and parsley. I chopped everything up and added it to the pan starting with the onions. I then added the bell pepper, mushrooms, some mince garlic and the herbs. And of course I added the mandatory trifecta of salt, pepper and garlic powder.
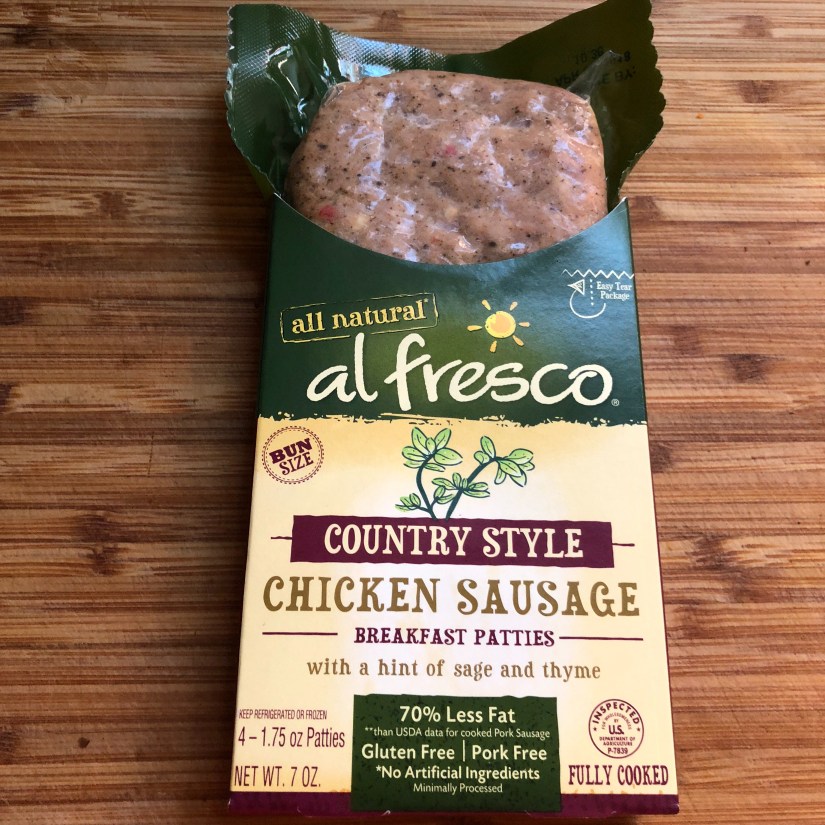
Once things were cooked down I added in some chicken sausage that I recently discovered. I like this one because it isn’t maple flavored or apple flavored or some other sweet nonsense. It’s actually a pretty nice replacement to the fattier pork country sausage.
I chopped up the sausage and added it to the pan and gave it good stir to coat everything and then added it to the waiting pie shells.
It actually looks pretty good right now. My fiancé, Lloyd, would probably love it if I just turned it into a massive empanada instead of adding the eggs. Except he loves eggs. Lloyd is basically Gaston and eats five dozen eggs everyday and is roughly the size of a barge. Speaking of eggs, I made a quick egg mixture with about 8 eggs, a splash of cream, salt and pepper. My secret ingredient is about a tablespoon of corn starch. It makes the eggs extra light and fluffy when they bake.
The next step is the all important cheese and decorating step. I had a little bit of jack cheese left in the fridge and I mixed that into the filling before I added the eggs and then topped with some cheddar and sliced cherry tomatoes. It made for a pretty pre-bake picture. And an even prettier post-bake shot.
Serves: 1-10. Who is to say you can’t eat two whole quiches all by yourself? You do you. I will not shame you with suggested portion sizes.
Prep time: 30 minutes
Cook time: 45 minutes
Ingredients***the veggies and herbs I used are just a suggestion, feel free to use whatever is in your fridge***
Onion
Bell pepper
Mushrooms
Herbs (chives, parsley, basil)
Minced garlic
Salt, pepper, garlic powder
8 Eggs
1 Tbsp Cream (optional)
1 Tbsp Cornstarch (optional)
Cheese
Cherry tomatoes
Frozen pie shells
Recipe
Preheat oven to 350 degrees fahrenheit.
Dice veggies and chop herbs.
Sautee your veggies starting with hardest and ending with softest. I did onions, bell peppers and then mushrooms.
Add in your garlic, herbs and seasonings. Don’t overcook your veggies mix because it’s going to cook some more in the oven and you don’t want a big soggy mess.
Chop up and add in your sausage if you are going for a non-veg quiche. I used the chicken sausage I mentioned above but you could put in whatever you happen to have in your fridge, including lunch meat you need to use up.
While your veggies/sausage are cooking down you can whip your eggs. Add them to a large bowl and fold in the salt/pepper and your optional cream and cornstarch.
Scoop your mixture into your pie shells and stir in some cheese.
Cover your veggies/sausage with your egg mix and then top with more cheese. I added on the sliced cherry tomatoes for some color.
Bake your pies on a baking sheet for about 45 minutes or until the center doesn’t jiggle and the top has gotten a nice golden brown coloration.
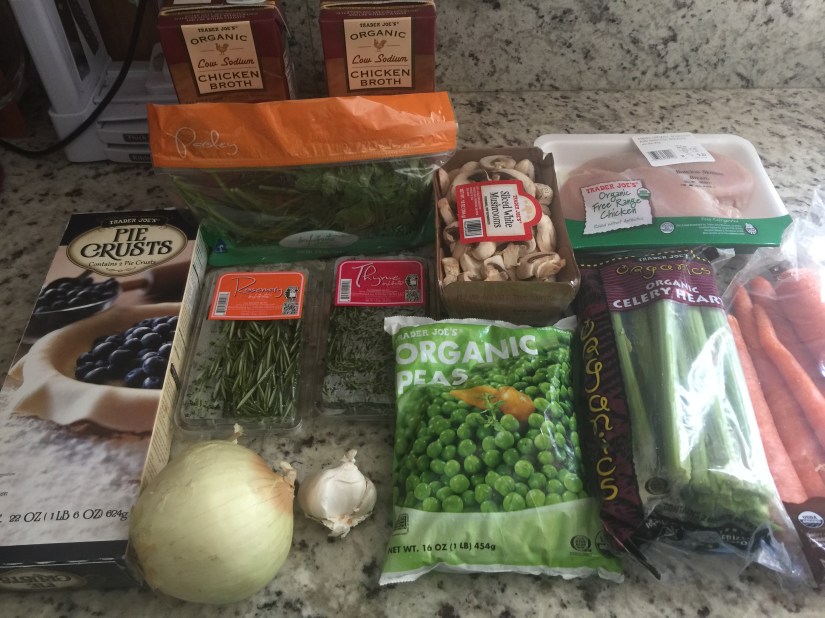
Chicken pot pie is basically synonymous with southern comfort. There are a lot of different recipes and approaches out there. Some more authentic, some more haute cuisine. This is my take on the southern classic. It’s not quite how my Mama used to make it. But that’s cause my Mama is Indian and it wasn’t chicken pot pie so much as chicken biryani. But, I digress. The first step is the grocery store. I usually have a kitchen stocked full of staple ingredients but when I woke up one morning last fall aching to make a chicken pot pie I had nothing. So I went to my handy dandy, around the corner from me, Trader Joe’s and did a very specific shop! I came back with nothing but what was on my list! Miracles do happen.
As you can see I cheated a little bit and used store bought pie crust. I do have an excellent pie crust recipe from food52 that calls for a little vodka. But that day I did have not the vodka or the patience to make a pie crust. I needed chicken pot pie in my mouth as quickly as possible. Which bring me to the recipe. If you want to take what is usually an hours long process of cooking/baking/prepping and speed things up the key is to be organized. Which is the case with most things in this life. The french have a word for this tactic it’s called mise en place and is literally translated to ‘putting in place.” So while my dutch oven slowly heated on the stove I set my pie crusts out to come to room temperature and got to dicing and chopping. I started with my onions, celery and carrots (a classic trilogy) and my herbs; rosemary and thyme.
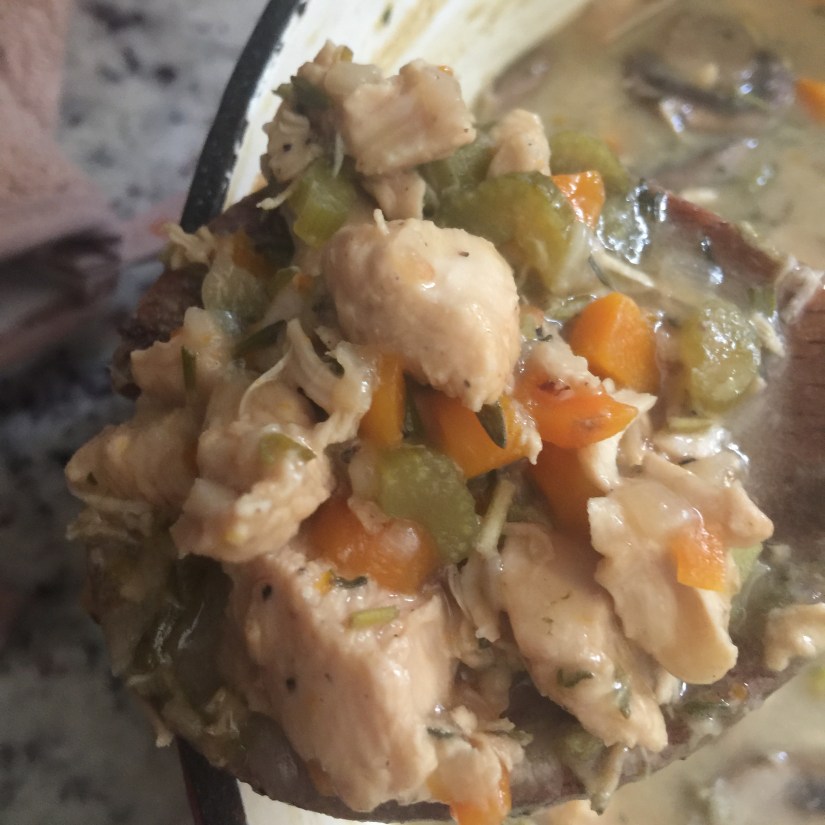
And then while I slowly cook my vegetables down (carrots first, followed by onions and celery) and add in my spices (salt, pepper, garlic powder) I coat my chicken in flour and herbs. This marinades the chicken and allows the flour to evenly coat and cook once it goes into the pot.
Once you add the chicken in things get even easier. Pour in your chicken stock (low sodium is my preference) and then add your mushrooms and peas. Cover and let this simmer away while you prep your pie crust. Mine was store bought so I just poured myself a glass a wine and checked my instagram for a few minutes. I’m just kidding, I already had a glass of wine, I poured myself a second.
After a little while on the stove your filling should look like this, chicken cooked through and beginning to shred, veggies soft and glistening. Your basic food porn. Now pour it into your pie crust shell and then feel free to get creative with the top! I went for circles and dots because it allowed for a number of cootie shot jokes during dinner. By this point I was on wine glass #3.
I actually ended up having to refrigerate the pie and eat it the next day because of a scheduling snafu with my fiancé. But it was still very tasty and my circles and dots held up fairly well! What do you think?
While your pan heats (I use a dutch oven) dice your onions, carrots and celery. Remove the leaves from the rosemary and thyme and rough chop them to whatever your tastes is. Peel and mince garlic. Cube chicken breast.
Add ingredients to the pan in the following order allowing each one to cook down before adding the next; carrots, onions, celery, garlic. Season with salt, pepper, garlic powder to taste as you go. Use splashes of your chicken stock deglaze as needed.
While your veggies are cooking coat your cubed chicken breasts in a mixture of the chopped herbs, flour and some more salt, pepper, garlic powder (to taste).
Once the veggies are cooked down add in your chicken and let this get a nice sear, use the chicken to deglaze. Once you are happy with the chicken you can add in the rest of the box of stock. As the flour cooks your sauce will begin to thicken.
Now is the time to add your mushrooms and peas. If you don’t like mushrooms or peas feel free to opt out.
Reduce your heat and let it simmer, covered, stirring occasionally.
Prep your pie crust and then add the pie filling once you are happy with it’s consistency.
Cover your pie with the second crust in any way that makes you happy and egg wash.
Place in preheated 375 degree Fahrenheit oven and bake for 30-40 minutes until crust is golden brown. This time may vary depending on what crust you use. Remember the filling is cooked, you are only using the oven to get your crust cooked to perfection.
PS: I was just double checking that I had all ingredients listed by comparing my list to the first picture up above when I realized that I have a bag of parsley in there. This recipe does not call for parsley. I have no idea why it is in there. I suspect a food ghost.
PPS: Please share your recipes and takes on this southern classic! I’m always looking for new and different takes on an old favorite. And I would love to hear about any tips and tricks that have passed down in your family!
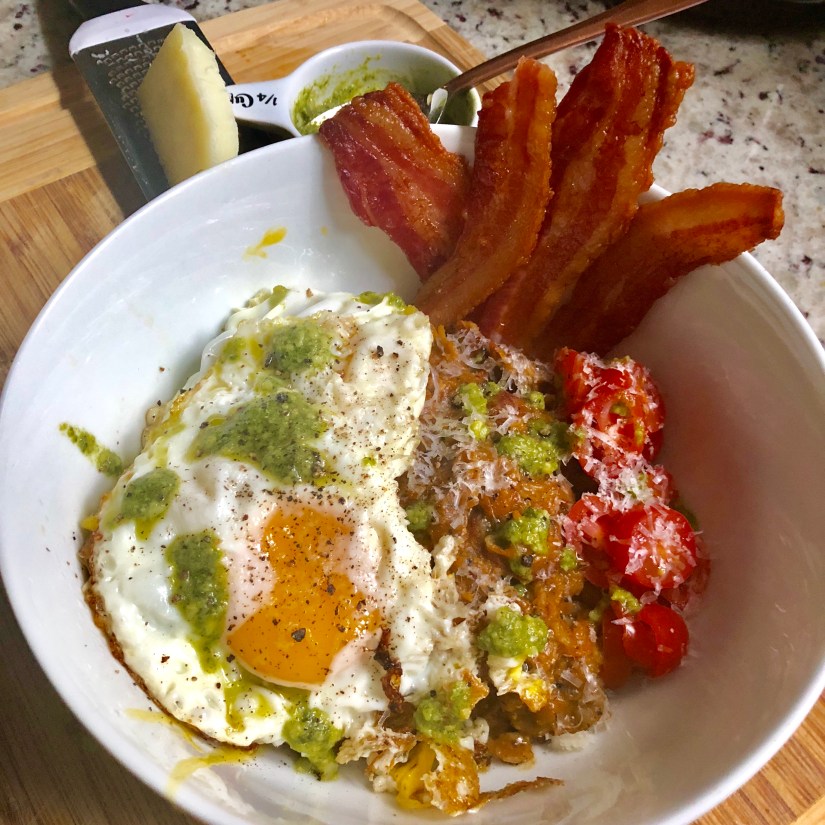
One thing that I love about Sundays is waking up and having the luxury of time to make a special breakfast. But, by the time I get around to getting in the kitchen it’s really more brunch time. Since neither of us in the house are big on a sweet breakfast we usually end up craving something savory for our first meal of the day. And on a cold, rainy February morning we also want something hot and filling. But the best part is relying on whatever just happens to be in the kitchen to put my meal together. This morning I decided to go for a savor brunch oatmeal. I know most people think of oatmeal as something reserved for dried fruit and brown sugar. But not in my house. We take chopped up chicken sausage, onions, bell peppers, spices and cook it down until glistening. Then add in your rolled or stone ground oats and cook in some low sodium chicken stock until everything is perfectly cooked. Add in a dash of cream and cheese and top with a fried egg. The best thing about this simple recipe is how endlessly versatile it is, today I used andouille sausage and there was a definite cajun kick. In the past I’ve used sweet fennel sausage and pesto for a more Italian kick. Korean sausage with scallions and sesame seeds was another combo I found delightful on a cold winter morning.
Start with some thinly sliced chicken sausage and sauté until you got those lovely crispy brown edges.
Add in your veggies of choice. I started with some diced red onions, moved onto orange bell peppers and finished it off with some minced garlic and frozen basil pureed basil leaves. I also added my dried spices and cooked everything down until it was nice and dry.
Now is the time to add your oatmeal! I like to toast the dried oats a little bit before adding in the chicken stock and letting them cook down. I use low sodium chicken stock because if I’m going to have salt in my food I’m adding it in myself. And then finish things off with a dollop of heavy cream. This is, of course, optional.
It doesn’t look hugely appetizing at this point but it smells amazing. Once you plate it and add your egg and other toppings no one will mind. I’ve listed the ingredients I used as well as the instructions down below. But this recipe is endlessly customizable so feel free to make it your own! Tell me how you fixed it in the comments!
Ingredients
Small onion
Medium bell pepper
2-3 minced garlic cloves
1 cube frozen basil leaves
2 finely sliced chicken sausage links
Salt, pepper, garlic powder and dried spices to taste
1 cup rolled oats (can be subbed for steel cut oats)
1 3/4 cups chicken stock, plus extra for deglazing
Eggs for frying (optional)
Bacon (optional)
Pesto (optional)
Grape tomatoes (optional)
Recipe
Cook thinly sliced chicken sausage until edges are brown and crispy in a pan on medium high heat
Add in diced onions until sweating
Add in diced bell peppers until sweating
Add in minced garlic and herbs (frozen, dried, fresh)
Add in your spices; salt, pepper, garlic powder, cumin, oregano, chili powder
Deglaze with chicken stock as needed
Once everything is dry add in the rolled oats and toast slightly.
Add in the chicken stock and reduce to low heat. Simmer for 10-15 minutes, stirring occasionally.
For a creamier version you can add in a dollop of cream or some grated cheese.
Plate in a large dinner bowl (I microwave my bowls so that the oatmeal stays hot while I fix my eggs)
Fry eggs to taste and place on top of oatmeal bed.
Place some sliced grape tomatoes along one edge and add pesto, pepper, and some grated cheese for an added aesthetic and taste.
Use bacon as garnish. That’s right, I said garnish.


 One thing that I love about Sundays is waking up and having the luxury of time to make a special breakfast. But, by the time I get around to getting in the kitchen it’s really more brunch time. Since neither of us in the house are big on a sweet breakfast we usually end up craving something savory for our first meal of the day. And on a cold, rainy February morning we also want something hot and filling. But the best part is relying on whatever just happens to be in the kitchen to put my meal together. This morning I decided to go for a savor brunch oatmeal. I know most people think of oatmeal as something reserved for dried fruit and brown sugar. But not in my house. We take chopped up chicken sausage, onions, bell peppers, spices and cook it down until glistening. Then add in your rolled or stone ground oats and cook in some low sodium chicken stock until everything is perfectly cooked. Add in a dash of cream and cheese and top with a fried egg. The best thing about this simple recipe is how endlessly versatile it is, today I used andouille sausage and there was a definite cajun kick. In the past I’ve used sweet fennel sausage and pesto for a more Italian kick. Korean sausage with scallions and sesame seeds was another combo I found delightful on a cold winter morning.